Welcome to Andy's Blog!
一念净心,花开遍世界-
Java基础-多线程
多线程概念
程序引入:
public class ThreadDemo {
	public static void main(String[] args) {
		// 代码1
		show();
		// 代码2
	}

	private static void show() {
		// 代码11
		method1();
		method2();
		// 代码22
	}

	private static void method2() {
		// 代码111
	}

	private static void method1() {
		// 代码222
	}
}
上面一段代码的程序执行流程如下:
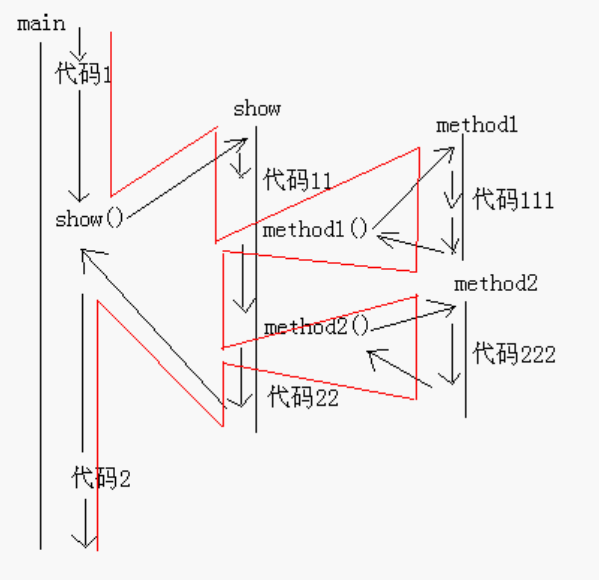 可以看出这是一段单线程程序的代码
多线程程序的执行流程举例:
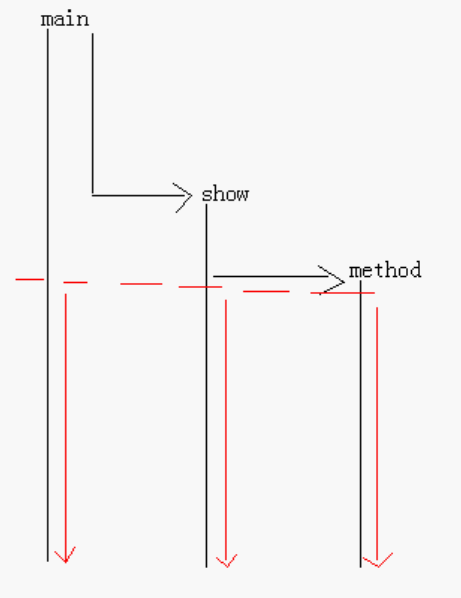 如果程序只有一条执行路劲,那么就是单线程程序,如果程序有多条执行路劲,那么就是多线程程序
什么是进程
进程是系统进行资源分配和调用的独立单位,每一个进程都有它自己的内存空间和系统资源。一个进程对应一个应用程序。在java的开发环境下启动JVM,就表示启动了一个进程。现代的计算机都是支持多进程的,在同一个操作系统中,可以同时启动多个进程。
多进程的作用
单进程计算机只能做一件事情。但需要电脑同时开多个程序时就需要用到多进程。
一个问题:对于单核计算机来讲,在同一个时间点上,游戏进程和音乐进程是同时在运行吗? 不是。因为计算机的CPU只能在某个时间点上做一件事。由于计算机将在“游戏进程”和“音乐进程”之间频繁的切换执行,切换速度极高,人类感觉游戏和音乐在同时进行。
注意:
- 多进程的作用不是提高执行速度,而是提高CPU的使用率。
- 进程和进程之间的内存是独立的。
什么是线程
线程是一个进程中的执行场景。一个进程可以启动多个线程。 线程是程序的执行单元,执行路径,是程序使用CPU的最 注意:同一个进程中的线程共享其进程中的内存和资源(共享的内存是堆内存和方法区内存,栈内存不共享,每个线程有自己的。)
多线程的作用
- 多线程不是为了提高执行速度,而是提高应用程序的使用率。程序的执行其实都是在抢CPU的资源,CPU的执行权,多个进程在抢这个资源,而其中的某一个进程如果执行路径比较多,就会有更高的几率抢到CPU的执行权,而且不能保证在哪个时刻能抢到,所以线程的执行有随机性。
- 线程和线程共享“堆内存和方法区内存”,栈内存是独立的,一个线程一个栈。
- 可以给现实世界中的人类一种错觉:感觉多个线程在同时并发执行。
java程序的运行原理
java命令会启动java虚拟机,启动JVM,等于启动了一个应用程序,表示启动了一个进程。该进程会自动启动一个“主线程”,然后主线程去调用某个类的main 方法。所以main方法运行在主线程中。
注意:JVM的启动时多线程的,因为垃圾回收线程也会先启动,防止出现内存溢出。
线程的生命周期
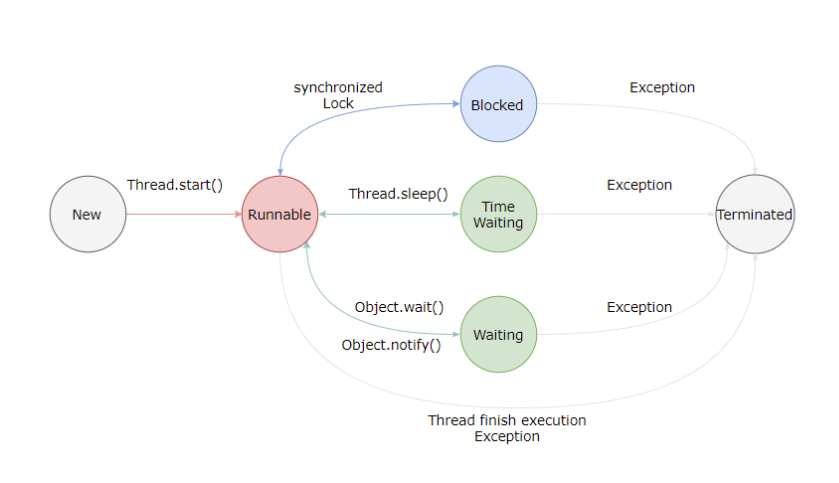
新建(New)
创建但为启动
可运行(Runnable)
一旦调用start()方法线程处于runnable状态。一个可运行的线程可能正在运行也可能没有运行,取决于操作系统给线程提供运行的时间。(Java规范没有将他作为一个单独的状态)包括了操作系统线程状态中的running和ready。
阻塞(Blocking)
等待获取一个排它锁,如果其线程释放了锁就会结束此状态。
无限期等待(Waiting)
限期等待(Timed Waiting)
死亡(Terminated)
可以是线程结束任务之后自己结束,或者产生了异常而结束。
线程的调度
线程有两种调度模型:
- 分时调度模型:所有线程轮流使用CPU的使用权,平均分配每个线程占用CPU的时间片。
- 抢占式调度模型:优先让优先级高的线程使用 CPU,如果线程的优先级相同,那么会随机选择一个,优先级高的线程获取的CPU时间片相对多一些。
Java使用的是抢占式调度模型。 可以通过以下方法进行设置和查询优先级
public final int getPriority()
public final void setPriority(int newPriority)
优先级字段 public static final int MAX_PRIORITY 10 public static final int MIN_PRIORITY 1 public static final int NORM_PRIORITY 5
注意:线程优先级仅表示获取CPU时间片的几率高,但是再运行此时多的时候才能看到较好的效果。
使用线程
继承Thread类
Thread类实现了Runable接口,自定义一个Thread的子类并实现run()方法。
public class MyThread extends Thread{
	// 重写run()方法,用来包含被线程执行的代码
	@Override
	public void run() {
		// 线程执行的代码一般时比较耗时的,这里进行模拟
		for(int i=0; i<100; i++) {
			System.out.println(i);
		}
	}
}
测试:
public class MyTest {
	public static void main(String[] args) {
		// 创建对象
		MyThread thread1 = new MyThread();
		MyThread thread2 = new MyThread();
		// 这里使用run方法相当于普通的方法调用,得到的时单线程的效果
		// thread.run();
		// thread.run();
		// 先启动线程,然后再由jvm调用,多线程的效果
		//thread.start();
		// IllegalThreadStateException
		// 因为这么做相当于thread线程被调用了两次,而不是两个线程启动
		//thread.start();

		// 需要创建两个线程
		thread1.start();
		thread2.start();
	}
}
注意: run()仅仅时封装被线程执行的代码,直接调用时普通方法,单线程的效果。 start()时先启动了线程,虚拟机会将该线程放入就绪队列中等待被调度,当一个线程被JVM调度时会执行该线程的 run() 方法,多线程的效果。
实现 Runnable 接口
实现 Runnable接口的类只能当做一个可以在线程中运行的任务,不是真正意义上的线程,因此最后还需要通过 Thread来调用。可以说任务是通过线程驱动从而执行的。
public class MyRunnable implements Runnable{
	@Override
	public void run() {
		System.out.println(Thread.currentThread().getName() + ": hello");
	}
}
public class Test { public static void main(String[] args) { MyRunnable runnable = new MyRunnable(); Thread thread = new Thread(runnable); thread.start(); } }两种方法比较
- 可以避免由于Java单继承带来的局限性。
- 适合多个相同程序的代码去处理同一个资源的情况,把线程同程序的代码,数据有效分离,较好的体现了面向对象的设计思想。
线程控制
Sleep
public static void sleep(long millis)方法会休眠当前正在执行的线程,millisec 单位为毫秒. sleep() 可能会抛出InterruptedException,因为异常不能跨线程传播回main()中,因此必须在本地进行处理。线程中抛出的其它异常也同样需要在本地进行处理。
// 休眠一秒
try {
	Thread.sleep(1000);
	} catch (InterruptedException e) {
	e.printStackTrace();
    }
Join
线程加入,在线程中调用另一个线程的join()方法,会将当前线程挂起,而不是忙等待,直到目标线程结束。 对于以下代码,虽然b线程先启动,但是因为在 b 线程中调用了a线程的join()方法,b线程会等待a线程结束才继续执行,因此最后能够保证a线程的输出先于b线程的输出。
public class JoinExample {

	private class A extends Thread {

		@Override
		public void run() {
			System.out.println("A");
		}
	}

	private class B extends Thread {
		private A a;

		B(A a) {
			this.a = a;
		}

		@Override
		public void run() {
			try {
				a.join();
			} catch (InterruptedException e) {
				e.printStackTrace();
			}
			System.out.println("B");
		}
	}

	public void test() {
		A a = new A();
		B b = new B(a);
		b.start();
		a.start();
	}
}
public class MyTest { public static void main(String[] args) { JoinExample example = new JoinExample(); example.test(); // A B } }yield
线程礼让,对静态方法Thread.yield()的调用声明了当前线程已经完成了生命周期中最重要的部分,可以切换给其它线程来执行。该方法只是对线程调度器的一个建议,该方法不会阻塞线程,只会将线程转换成就绪状态,让系统的调度器重新调度一次,而且也只是建议具有相同优先级的或者更高级别的其它线程可以运行。
public void run() {
    Thread.yield();
}
Daemon
守护线程是程序运行时在后台提供服务的线程,不属于程序中不可或缺的部分。 当所有非守护线程结束时,程序也就终止,同时会杀死所有守护线程。 使用setDaemon()方法将一个线程设置为守护线程。
中断
InterruptedException
通过调用一个线程的 interrupt() 来中断该线程,如果该线程处于阻塞、限期等待或者无限期等待状态,那么就会抛出 InterruptedException,从而提前结束该线程。但是不能中断 I/O 阻塞和 synchronized 锁阻塞。
public class InterruptedDemo {
	public static void main(String[] args) {
		Thread t1 = new MyThread();

		t1.start();
		t1.interrupt();

		System.out.println("main run");
	}
}

public class MyThread extends Thread{
	@Override
	public void run() {
		try {
			Thread.sleep(2000);
			System.out.println("Thread run");
		} catch (InterruptedException e) {
			e.printStackTrace();
		}
	}
}
运行结果 main run java.lang.InterruptedException: sleep interrupted at java.lang.Thread.sleep(Native Method) at love.minmin.thread11.MyThread.run(MyThread.java:7)interrupted()
如果一个线程的run()方法执行一个无限循环,并且没有执行 sleep()等会抛出InterruptedException 的操作,那么调用线程的interrupt()方法就无法使线程提前结束。
但是调用 interrupt()方法会设置线程的中断标记,此时调用 interrupted()方法会返回true。因此可以在循环体中使用interrupted()方法来判断线程是否处于中断状态,从而提前结束线程。
public class InterruptedDemo {
	public static void main(String[] args) {
		MyThread2 t1 = new MyThread2();

		t1.start();
		t1.interrupt();

		System.out.println("main run");
	}
}

public class MyThread2 extends Thread{
	@Override
	public void run() {
		while(!interrupted()) {
			//..
		}
		System.out.println("Thread end");
	}
}

运行结果
main run
Thread end
互斥同步
先看一个简单多线程实现卖票功能的程序
public class SellTicket implements Runnable{
	private int ticket = 100;

	@Override
	public void run() {
		while(ticket > 0) {
			try {
				Thread.sleep(1000);
			} catch (InterruptedException e) {
				e.printStackTrace();
			}

			// 这里有可能出现t1,t1,t3输出相同的票
			// 因为cpu的操作是原子性的
			// 加入t1抢到执行权,这个时候先记录ticket以前的值,然后--,然后输出
			// 输出之后t2抢到,这个时候t2输出就是--之后的值,但是如果在之前抢到,那么t2输出也是100
			System.out.println(Thread.currentThread().getName() + ": " + ticket--);
			// 也会出现负数票,是随机性和延迟导致的,最多输出-1张票
		}
	}
}
public class Test { public static void main(String[] args) { SellTicket ticket = new SellTicket(); Thread thread1 = new Thread(ticket); Thread thread2 = new Thread(ticket); Thread thread3 = new Thread(ticket); thread1.start(); thread2.start(); thread3.start(); } }该程序运行时存在一张票卖多次以及负数票的情况,需要进行加锁 Java 提供了两种锁机制来控制多个线程对共享资源的互斥访问,第一个是JVM实现的synchronized,而另一个是 JDK 实现的 ReentrantLock。
synchronized
同步代码块
    private Object obj = new Object();

	public void run() {
		while(ticket > 0) {
			synchronized (obj) {
				try {
					Thread.sleep(100);
				} catch (InterruptedException e) {
					e.printStackTrace();
				}
				System.out.println(Thread.currentThread().getName() + ": " + ticket--);
			}
		}
	}
这里同步对象可以选择任意一个对象,但是要保证三个线程所使用的对象为同一个
同步一个方法
public void run() {
		while(ticket > 0) {
			if (ticket % 2 ==0) {
				synchronized (this) {
					try {
						Thread.sleep(100);
					} catch (InterruptedException e) {
						e.printStackTrace();
					}
					System.out.println(Thread.currentThread().getName() + ": " + ticket--);
				}
			} else {
				ticket();
			}
		}
	}

private synchronized void ticket() {
		try {
			Thread.sleep(100);
		} catch (InterruptedException e) {
			e.printStackTrace();
		}
		System.out.println(Thread.currentThread().getName() + ": " + ticket--);
	}
同步方法的锁对象为this
同步一个静态方法
@Override
public void run() {
	while(ticket > 0) {
		if (ticket % 2 ==0) {
			synchronized (SellTicket.class) {
				try {
					Thread.sleep(100);
				} catch (InterruptedException e) {
					e.printStackTrace();
				}
					System.out.println(Thread.currentThread().getName() + ": " + ticket--);				}
		} else {
			ticket();
		}
	}
}

private static synchronized void ticket() {
		try {
			Thread.sleep(100);
		} catch (InterruptedException e) {
			e.printStackTrace();
		}
		System.out.println(Thread.currentThread().getName() + ": " + ticket--);
	}
静态方法锁对象为类的字节码文件
ReentrantLock
JDK1.5ReentrantLock是java.util.concurrent(J.U.C)包中的锁。 代码举例:
public class SellTicket implements Runnable{
	private int ticket = 100;
	private Lock lock = new ReentrantLock();

	@Override
	public void run() {
		while(true) {
			lock.lock();

			try {
				if (ticket > 0) {
					try {
						Thread.sleep(100);
					} catch (InterruptedException e) {
						e.printStackTrace();
					}
					System.out.println(Thread.currentThread().getName() + ": " + ticket--);
				}
			} finally {
			    // 必须要解锁,防止死锁问题
				lock.unlock();
			}
		}

	}
}
死锁
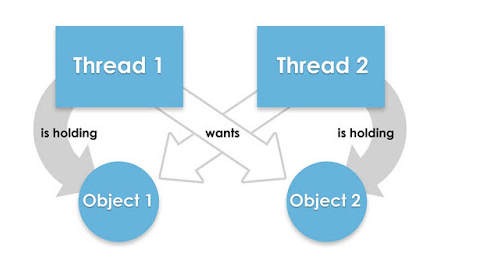
死锁是指两个或两个以上的进程在执行过程中,因争夺资源而造成的一种互相等待的现象,若无外力作用,它们都将无法推进下去。这是一个严重的问题,因为死锁会让你的程序挂起无法完成任务,死锁的发生必须满足以下四个条件:
- 互斥条件:一个资源每次只能被一个进程使用
- 请求与保持条件:一个进程因请求资源而阻塞时,对已获得的资源保持不放。
- 不剥夺条件:进程已获得的资源,在末使用完之前,不能强行剥夺。
- 循环等待条件:若干进程之间形成一种头尾相接的循环等待资源关系。
代码举例
public class DeadLock extends Thread{
	private boolean flag;

	public DeadLock(boolean flag) {
		this.flag = flag;
	}

	@Override
	public void run() {
		if(flag) {
			synchronized (MyLock.objA) {
				System.out.println("if objA");
				synchronized (MyLock.objB) {
					System.out.println("if objB");
				}
			}
		} else {
			synchronized (MyLock.objB) {
				System.out.println("else objB");
				synchronized (MyLock.objA) {
					System.out.println("else objA");
				}
			}
		}
	}
}

class MyLock {
	public static final Object objA = new Object();
	public static final Object objB = new Object();
}
使用选择
除非需要使用 ReentrantLock 的高级功能,否则优先使用 synchronized。这是因为 synchronized 是 JVM 实现的一种锁机制,JVM 原生地支持它,而 ReentrantLock 不是所有的 JDK 版本都支持。并且使用 synchronized 不用担心没有释放锁而导致死锁问题,因为 JVM 会确保锁的释放。
线程间通信问题
线程间通信问题指的是线程间争对同一种资源的操作。 注意: 1.不同种类的线程都要加锁 2.锁要是同一个
wait() notify() notifyAll()
它们都属于Object的一部分,而不属于Thread。因为这些方法只能被锁对象调用,而锁对象是任意对象,所以是Object。 调用 wait() 使得线程等待某个条件满足,线程在等待时会被挂起,当其他线程的运行使得这个条件满足时,其它线程会调用notify()或者notifyAll() 来唤醒挂起的线程。
只能用在同步方法或者同步控制块中使用,否则会在运行时抛出 IllegalMonitorStateExeception。
使用 wait() 挂起期间,线程会释放锁。这是因为,如果没有释放锁,那么其它线程就无法进入对象的同步方法或者同步控制块中,那么就无法执行 notify() 或者notifyAll()来唤醒挂起的线程,造成死锁。
notify()唤醒之后不代表你可以立马执行,必须还要抢CPU执行权
wait()和sleep()的区别 1.wait() 是 Object 的方法,而 sleep() 是 Thread 的静态方法; 2.wait() 会释放锁,sleep() 不会。 3.sleep()必须指定时间,wait()不需要
-
Java基础-ArrayList源码分析
ArrayList概述
首先声明一下接下来的几篇关于容器源码的分析都是基于JDK1.8的。
public class ArrayList<E> extends AbstractList<E>
        implements List<E>, RandomAccess, Cloneable, java.io.Serializable
{
从ArrayList的声明中我们可以看到,其实现了RandomAcess接口,但是LinkedList没有实现这一接口,先说一下RandomAccess接口的作用。
查看RandomAccess源码:
public interface RandomAccess {
}
可以看到其实一个标记接口(Maker Interface),其作用是实现了这个接口就支持随机访问,由于ArrayList底层是数组,所以支持随机访问是理所当然的。
通过Collections中的shuffle()方法来加深理解:
public static void shuffle(List<?> list, Random rnd) {
    int size = list.size();
    if (size < SHUFFLE_THRESHOLD || list instanceof RandomAccess) {
        for (int i=size; i>1; i--)
            swap(list, i-1, rnd.nextInt(i));
    } else {
        Object arr[] = list.toArray();

        // Shuffle array
        for (int i=size; i>1; i--)
            swap(arr, i-1, rnd.nextInt(i));

        // Dump array back into list
        // instead of using a raw type here, it's possible to capture
        // the wildcard but it will require a call to a supplementary
        // private method
        ListIterator it = list.listIterator();
        for (int i=0; i<arr.length; i++) {
            it.next();
            it.set(arr[i]);
        }
    }
}
从上述源码中可以看出如果一个类实现了RandomAccess接口,那么在该类的方法就可以使用
instanceof来判断该类是否实现了RandomAccess接口,也就实现该接口标记的作用。属性
接着看ArrayList的源码,首先是其属性。
/** ArrayList默认的容量为10
*/
private static final int DEFAULT_CAPACITY = 10;

/**
 * 这是一个共享的空的数组实例,当使用new ArrayList(0) 或者new ArrayList(Collection<? extends E> c)
 * 并且 c.size() = 0 的时候将elementData 数组讲指向这个实例对象。
 */
private static final Object[] EMPTY_ELEMENTDATA = {};

/**
 * 另一个共享空数组实例,再第一次add元素的时候将使用它来判断数组大小是否设置为DEFAULT_CAPACITY
 */
private static final Object[] DEFAULTCAPACITY_EMPTY_ELEMENTDATA = {};

/**
 * 真正装载集合元素的底层数组
 * transient表示该成员变量无法被Serializable 序列化
 */
transient Object[] elementData; // non-private to simplify nested class access

/**
 * ArrayList的长度(the number of elements it contains).
 */
private int size;
构造方法
ArrayList 一共三种构造方式,我们先从无参的构造方法来开始
无参构造
/**
 * Constructs an empty list with an initial capacity of ten.
 */
public ArrayList() {
    this.elementData = DEFAULTCAPACITY_EMPTY_ELEMENTDATA;
    }
用得最多的一个构造方法,源码注释显示这会构造一个初始容量为10的空列表,但是其指向的是
DEFAULTCAPACITY_EMPTY_ELEMENTDATA这个空数组。原因在于调用
add方法的时候会调用ensureCapacityInternal方法进行容量的判断:private void ensureCapacityInternal(int minCapacity) { if (elementData == DEFAULTCAPACITY_EMPTY_ELEMENTDATA) { minCapacity = Math.max(DEFAULT_CAPACITY, minCapacity); } ensureExplicitCapacity(minCapacity); }所以在第一次使用add方法的时候容量就被设为10.
指定初始容量的构造方法
/**
 * Constructs an empty list with the specified initial capacity.
 *
 * @param  initialCapacity  the initial capacity of the list
 * @throws IllegalArgumentException if the specified initial capacity
 *         is negative
 */
public ArrayList(int initialCapacity) {
    if (initialCapacity > 0) {
        this.elementData = new Object[initialCapacity];
    } else if (initialCapacity == 0) {
        this.elementData = EMPTY_ELEMENTDATA;
    } else {
        throw new IllegalArgumentException("Illegal Capacity: "+ initialCapacity);
    }
}
这个构造方法的意义在于,如果在使用ArrayList时知道其里面容纳的element的个数,那么推荐使用该方法,因为如果让ArrayList自动扩容会产生一定的内存开销,但这个开销在知道容量的时候时可以避免的。
从源码中可以看出当给定容量为0时,会使用
EMPTY_ELEMENTDATA作为暂存数组,这是这个空数组的一个用处,当容量大于0时会给elementData创建一个数组。使用另个一个集合 Collection 的构造方法
public ArrayList(Collection<? extends E> c) {
    elementData = c.toArray();
    if ((size = elementData.length) != 0) {
        // c.toArray might (incorrectly) not return Object[] (see 6260652)
        if (elementData.getClass() != Object[].class)
            elementData = Arrays.copyOf(elementData, size, Object[].class);
    } else {
        // replace with empty array.
        this.elementData = EMPTY_ELEMENTDATA;
    }
}
该构造方法主要涉及两个方法,一个是Collection.toArray(),还有一个是Arrays.copyof()。
Collection.toArray()
首先来看Collection.toArray(),这是Collection接口定义的方法,具体实现在其实现类中. 观察下面一段代码
public static void main(String[] args) {
	ArrayList<String> list = new ArrayList<>();
	list.add("hello");
	list.add("world");
	list.add("java");

	List<String> subclass = Arrays.asList("hello", "world", "java");

	Object[] objects = subclass.toArray();
	Object[] listArr = list.toArray();

	// class java.util.ArrayList
	System.out.println(list.getClass());
	// class java.util.Arrays$ArrayList
	System.out.println(subclass.getClass());

	// String[]
	System.out.println(objects.getClass().getSimpleName());

	// Object[]
	System.out.println(listArr.getClass().getSimpleName());

	// 正确执行
	listArr[0] = new Object();
	//java.lang.ArrayStoreException
	objects[0] = new Object();
}
通过观察可以知道通过Arrays.asList()方法得到的subclass其实是Arrays的内部类
class java.util.Arrays$ArrayList,这个时候通过subclass.toArray()得到的数组是String[],即elementData.getClass() != Object[].class,在测试代码中objects[0] = new Object();会报错java.lang.ArrayStoreException,所以在构造方法中要做这个判断。具体可以接着看Arrays的源码。
public static <T> List<T> asList(T... a) {
    return new ArrayList<>(a);
}

private static class ArrayList<E> extends AbstractList<E>
    implements RandomAccess, java.io.Serializable
{
    // ...

    @Override
    public Object[] toArray() {
        return a.clone();
    }

    // ...
}
通过上述源码可以,asList()返回的subclass是Arrays的内部类
Arrays$ArrayList,所以将subclass作为参数放入构造方法中调用的toArray()是Arrays内部类的方法,即a.clone(),这个clone()方法不会改变数组的类型,所以当原始数组放的是String类型,返回的还是String类型,此时对这个数组操作就会出现java.lang.ArrayStoreException的错误。其实我们可以认为这是 jdk 的一个 bug,早在 05年的时候被人提出来了,但是一直没修复,但是在新的 「jdk 1.9」 种这个 bug 被修复了。
可以参考bug 6260652获取更多信息。
Arrays.copyOf 方法
这个方法是在集合源码中常见的一个方法,他有很多重载方式,我们来看下最根本的方法:
public static <T,U> T[] copyOf(U[] original, int newLength, Class<? extends T[]> newType) {
    @SuppressWarnings("unchecked")
    T[] copy = ((Object)newType == (Object)Object[].class)
        ? (T[]) new Object[newLength]
        // 通过反射构造泛型数组
        : (T[]) Array.newInstance(newType.getComponentType(), newLength);
    // 使用native方法批量赋值元素到copy中
    System.arraycopy(original, 0, copy, 0, Math.min(original.length, newLength));
    return copy;
}
可以看出在
Arrays.copyof()方法中首先判断指定数组类型是否为Object[],如果不是就使用反射区构造是定类型的数组,然后用System.arraycopy()实现数组的复制并返回。 其中newlength如果比originLength大,那么其余部分就为null,如:String[] strArr = {"love", "minmin"}; Object[] objArr = Arrays.copyOf(strArr, 5, Object[].class); // [love, minmin, null, null, null] System.out.println(Arrays.toString(objArr));不过ArrayList源码中,传递的newlength为
c.siez(),所以不会出现null。补充资料:System:System.arraycopy方法详解
扩容
这块内容是面试的重点,先看一下如何添加元素。
private int size;

public boolean add(E e) {
    ensureCapacityInternal(size + 1);  // Increments modCount!!
    elementData[size++] = e;
    return true;
}
以上是扩容操作,首先会调用
ensureCapacityInternal方法了检查是否需要扩容,接下来就是常规的数组添加元素操作。注意,size是成员变量,在创建集合是初始默认为0.
// AbstractList类中的成员变量
protected transient int modCount = 0;

private void ensureCapacityInternal(int minCapacity) {
    if (elementData == DEFAULTCAPACITY_EMPTY_ELEMENTDATA) {
        minCapacity = Math.max(DEFAULT_CAPACITY, minCapacity);
    }
    // 扩容判断
    ensureExplicitCapacity(minCapacity);
}

private void ensureExplicitCapacity(int minCapacity) {
    // 操作数+1,用于保证并发访问
    modCount++;

    // overflow-conscious code
    if (minCapacity - elementData.length > 0)
    grow(minCapacity);
}
以上代码进行了扩容前的判断工作,当使用无参构造创建ArrayLsit,第一次进行add时,执行
if (minCapacity - elementData.length > 0)结果为10-0 > 0,所以会进行grow()方法。private static final int MAX_ARRAY_SIZE = Integer.MAX_VALUE - 8; private void grow(int minCapacity) { // overflow-conscious code int oldCapacity = elementData.length; int newCapacity = oldCapacity + (oldCapacity >> 1); if (newCapacity - minCapacity < 0) newCapacity = minCapacity; if (newCapacity - MAX_ARRAY_SIZE > 0) newCapacity = hugeCapacity(minCapacity); // minCapacity is usually close to size, so this is a win: elementData = Arrays.copyOf(elementData, newCapacity); } private static int hugeCapacity(int minCapacity) { if (minCapacity < 0) // overflow throw new OutOfMemoryError(); return (minCapacity > MAX_ARRAY_SIZE) ? Integer.MAX_VALUE : MAX_ARRAY_SIZE; }从源码中可以看到
newCapacity设为原来elementData.length的1.5倍,minCapacity为size+1或者DEFAULT_CAPACITY主要设计的知识点为: 1.每次扩容都扩大为原来size的1.5倍(如果newCapacity> MAX_ARRAY_SIZE,return (minCapacity > MAX_ARRAY_SIZE) ?Integer.MAX_VALUE : MAX_ARRAY_SIZE) 2.每次扩容都要将原来的数组拷贝到新的的数组,所以扩容是比较消耗性能的。在指定坐标添加元素
public void add(int index, E element) {
    rangeCheckForAdd(index);

    ensureCapacityInternal(size + 1);  // Increments modCount!!
    System.arraycopy(elementData, index, elementData, index + 1,size - index);
    elementData[index] = element;
    size++;
}

private void rangeCheckForAdd(int index) {
    if (index > size || index < 0)
        throw new IndexOutOfBoundsException(outOfBoundsMsg(index));
}
主要过程是把index往后的元素拷贝到index+1往后的位置,空出index给新加的元素。
批量添加元素
public boolean addAll(Collection<? extends E> c) {
    Object[] a = c.toArray();
    int numNew = a.length;
    ensureCapacityInternal(size + numNew);  // Increments modCount
    System.arraycopy(a, 0, elementData, size, numNew);
    size += numNew;
    return numNew != 0;
}
主要步骤为使用
System.arraycopy方法将Object[]数组中的内容拷贝到原来数组后面。在指定位置批量添加
public boolean addAll(int index, Collection<? extends E> c) {
    rangeCheckForAdd(index);

    Object[] a = c.toArray();
    int numNew = a.length;
    ensureCapacityInternal(size + numNew);  // Increments modCount

    int numMoved = size - index;
    if (numMoved > 0)
        System.arraycopy(elementData, index, elementData, index + numNew, numMoved);

    System.arraycopy(a, 0, elementData, index, numNew);
    size += numNew;
    return numNew != 0;
}
与批量添加元素主要的不同是对于numMoved做了判读,如果numMoved>0,说明index在0-size之间,需要移动部分元素,如果numMoved<=0,说明index在size之后,不需要移动元素,只需要把添加的元素copy到指定index。
删除元素
public E remove(int index) {
    rangeCheck(index);

    modCount++;
    E oldValue = elementData(index);

    int numMoved = size - index - 1;
    if (numMoved > 0)
        System.arraycopy(elementData, index+1, elementData, index, numMoved);
    elementData[--size] = null; // clear to let GC do its work

    return oldValue;
}

 public boolean remove(Object o) {
    if (o == null) {
        for (int index = 0; index < size; index++)
            if (elementData[index] == null) {
                fastRemove(index);
                return true;
            }
    } else {
        for (int index = 0; index < size; index++)
            if (o.equals(elementData[index])) {
                fastRemove(index);
                return true;
            }
    }
    return false;
}

private void rangeCheck(int index) {
    if (index >= size)
        throw new IndexOutOfBoundsException(outOfBoundsMsg(index));
}

private void fastRemove(int index) {
    modCount++;
    int numMoved = size - index - 1;
    if (numMoved > 0)
        System.arraycopy(elementData, index+1, elementData, index,numMoved);
    elementData[--size] = null; // clear to let GC do its work
}
注意: 1.方法remove(int index)中会首先进行
rangeCheck,因为size不一定等于element.length,所以要做index >= size的判断。 2.需要调用 System.arraycopy() 将 index+1 后面的元素都复制到index位置上,该操作的时间复杂度为 O(N),可以看出ArrayList删除元素的代价是非常高的。 3.如果数组中有指定多个与o相同的元素只会移除角标最小的那个,并且 null 和 非null 的时候判断方法不一样。removeAll与retainAll
public boolean removeAll(Collection<?> c) {
    Objects.requireNonNull(c);
    return batchRemove(c, false);
}

public boolean retainAll(Collection<?> c) {
    Objects.requireNonNull(c);
    return batchRemove(c, true);
}

private boolean batchRemove(Collection<?> c, boolean complement) {
    final Object[] elementData = this.elementData;
    int r = 0, w = 0;
    boolean modified = false;
    try {
        for (; r < size; r++)
            if (c.contains(elementData[r]) == complement)
                elementData[w++] = elementData[r];
    } finally {
        // Preserve behavioral compatibility with AbstractCollection,
        // even if c.contains() throws.
        if (r != size) {
        System.arraycopy(elementData, r,
                         elementData, w,
                         size - r);
            w += size - r;
        }
        if (w != size) {
            // clear to let GC do its work
            for (int i = w; i < size; i++)
                elementData[i] = null;
            modCount += size - w;
            size = w;
            modified = true;
        }
    }
    return modified;
}
contains()
public boolean contains(Object o) {
    return indexOf(o) >= 0;
}

public int indexOf(Object o) {
    if (o == null) {
        for (int i = 0; i < size; i++)
            if (elementData[i]==null)
                return i;
    } else {
        for (int i = 0; i < size; i++)
            if (o.equals(elementData[i]))                   return i;
    }
    return -1;
}
contains()方法要注意的是java中equals方法默认比较的是两个对象的引用,所以当ArrayList中存放的是对象时,要改写对象的equals()方法
List<Student> stulist = new ArrayList<>();
	Student s1 = new Student(18, "minmin");
	Student s2 = new Student(18, "minmin");

	stulist.add(s1);

	System.out.println(stulist.contains(s1)); // true
	System.out.println(stulist.contains(s2)); // false
从上面代码可以看出,因为Student类没有重写equals方法,所以第二个输出为false,如果业务需要按照内容判断contains则需要重写equals方法。
Fail-Fast
modCount用来记录ArrayList结构发生变化的次数。结构发生变化是指添加或者删除至少一个元素的所有操作,或者是调整内部数组的大小,仅仅只是设置元素的值不算结构发生变化。
在进行序列化或者迭代等操作时,需要比较操作前后
modCount是否改变,如果改变了需要抛出ConcurrentModificationException。看一下代码:
public static void main(String[] args) {
	List<Integer> list = new ArrayList<>();
	list.add(1);
	list.add(2);
	list.add(3);
	list.add(3);
	for(int i = 0; i<list.size(); i++) {
		if(list.get(i) == 3) {
			list.remove(i);
		}
	}
	System.out.println(list);
}

// 输出:[1, 2, 3]
首先上述代码没有报错,但是结果却不是想要的,原因在于remove()操作改变了size,本来size为4,但第一次remove之后,size变为3,循环直接结束,所以最后一个3没有remove。
int n = list.size();
for(int i = 0; i<n; i++) {
	if(list.get(i) == 3) {
		list.remove(i);
	}
}
当把for循环改成上述代码,则会报错
java.lang.IndexOutOfBoundsException,因为当i=3时,get(3)越界。继续看下一段代码:
public static void main(String[] args) {
	ArrayList<Integer> list = new ArrayList<Integer>();
    list.add(2);
    Iterator<Integer> iterator = list.iterator();
    while(iterator.hasNext()){
        Integer integer = iterator.next();
        if(integer==2)
            list.remove(integer);
    }
}

public boolean hasNext() {
    return cursor != size;
}

public E next() {
    checkForComodification();
    int i = cursor;
    if (i >= size)
        throw new NoSuchElementException();
    Object[] elementData = ArrayList.this.elementData;
    if (i >= elementData.length)
        throw new ConcurrentModificationException();
    cursor = i + 1;
    return (E) elementData[lastRet = i];
}

public void remove() {
    if (lastRet < 0)
        throw new IllegalStateException();
    checkForComodification();
        try {
        ArrayList.this.remove(lastRet);
        cursor = lastRet;
        lastRet = -1;
        expectedModCount = modCount;
    } catch (IndexOutOfBoundsException ex) {
        throw new ConcurrentModificationException();
    }
}

final void checkForComodification() {
    if (modCount != expectedModCount)
        throw new ConcurrentModificationException();
}
上述代码会抛出
java.util.ConcurrentModificationException,因为第一次remove操作之后,modCount增加了1,但是expectedModCount没变,所以第二次调用next()方法时首先执行checkForComodification()方法,随后抛出异常。解决方法: 将list.remove()改为iterator.remove(),因为其多了以下一步操作,或者使用for加get遍历。
expectedModCount = modCount;多线程下的解决方法可参考这篇博客:Java ConcurrentModificationException
序列化(TODO)
总结: 1.允许存放(不止一个)null元素 2.允许存放重复数据,存储顺序按照元素的添加顺序 3.ArrayList 并不是一个线程安全的集合。如果集合的增删操作需要保证线程的安全性,可以考虑使用 CopyOnWriteArrayList或者使collections.synchronizedList(List)函数返回一个线程安全的ArrayList类.
-
算法与数据结构-排序
本文记录几种常见的排序算法,代码参考
《算法(第4版)》官网通用代码
// exchange a[i] and a[j]
public static void exch(Comparable[] a, int i, int j) {
	Comparable swap = a[i];
	a[i] = a[j];
	a[j] = swap;
}

// is v < w?	public static boolean less(Comparable v, Comparable w) {
	return v.compareTo(w) < 0;
}
选择排序
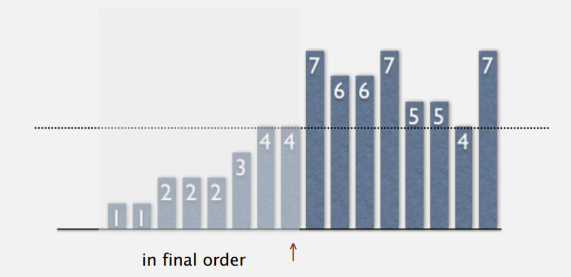
现象:
- 设已排序的和未排序的交界处为↑,则每次循环,↑从左往右移动一个位置
- ↑左边的元素(包括↑)固定了,且升序
- ↑ 右边的任一元素全部比左边的所有元素都大
思路:
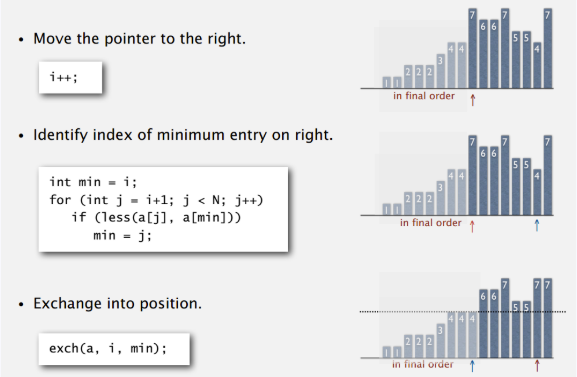
代码:
public static void selectionSort(Comparable[] a) {
	if(a == null || a.length < 2) {
	return;
	}

	for(int i = 0; i<a.length; i++) {
		int min = i;
		for(int j=i+1; j<a.length; j++) {
			if(less(a[j], a[min])) {
				min = j;
			}
		}
		exec(a, i, min);
	}
}
复杂度与特点分析:
- 时间复杂度:O(n^2), 空间复杂度:O(1)
- 运行时间与输入数据的排列状态无关,运行次数都是一样的
- 数据移动最少,交换的次数与数组的大小是线性关系。

冒泡排序
思路:
- 从左到右不断交换相邻逆序的元素,在一轮的循环之后,可以让未排序的最大元素上浮到右侧。
- 在一轮循环中,如果没有发生交换,就说明数组已经是有序的,此时可以直接退出。
代码:
public static void bubbleSort(Comparable[] a) {
	if (a == null || a.length < 2) {
		return;
	}

	int n = a.length;
	boolean isSort = false;
	for (int i = n; i > 1 && !isSort; i--) {
		isSort = true;
		for (int j = 0; j < i - 1; j++) {
			if (less(a[j + 1], a[j])) {
				exec(a, j + 1, j);
				isSort = false;
			}
		}
	}
}
复杂度与特点分析:
- 时间复杂度:O(n^2), 空间复杂度:O(1)
- 运行时间与输入数据的排列状态有关,即在一轮循环中,如果没有发生交换,就说明数组已经是有序的,此时可以直接退出。

插入排序
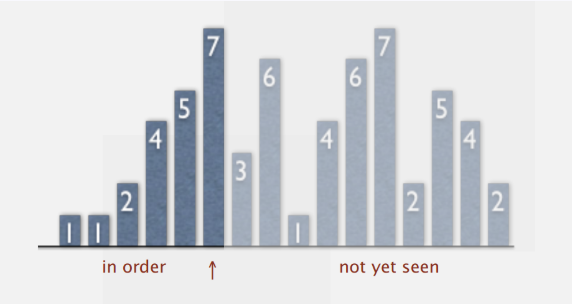
现象:
- 设已排序的和未排序的交界处为↑,则每次循环,↑从左往右移动一个位置
- ↑左边的元素(包括↑)且升序,但位置不固定(因为后续可能会因插入而移动)
- ↑右边的元素还不可见
步骤:
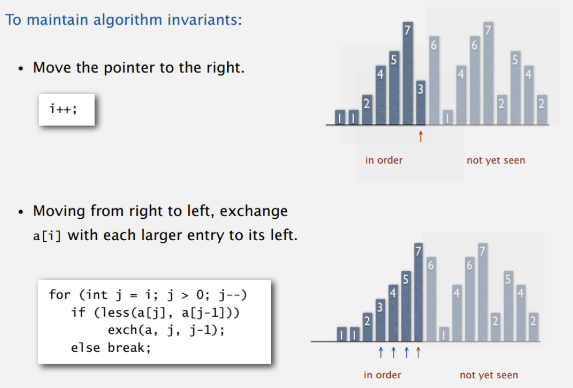
代码:
public static void insertSort(Comparable[] a) {
	if (a == null || a.length < 2) {
		return;
	}

	int n = a.length;
	for (int i = 1; i < n; i++) {
		for (int j = i - 1; j >= 0 && less(a[j + 1], a[j]); j--) {
			exec(a, j + 1, j);
		}
	}
}
复杂度与特点分析:
- 时间复杂度:O(n^2)(最坏情况), 空间复杂度:O(1)
- 平均情况下插入排序需要 ~N2/4 比较以及 ~N2/4 次交换;
- 最坏的情况下需要 ~N2/2 比较以及 ~N2/2 次交换,最坏的情况是数组是倒序的;
- 最好的情况下需要N-1次比较和0次交换,最好的情况就是数组已经有序了。
- 运行时间和输入有关,当输入已排序时,时间复杂度是O(n),交换的次数等于输入中倒置(inversion)的个数
- 插入排序适合部分有序数组,也适合小规模数组。

插入排序
对于大规模的数组,插入排序很慢,因为它只能交换相邻的元素,每次只能将逆序数量减少 1。 希尔排序的出现就是为了解决插入排序的这种局限性,它通过交换不相邻的元素,每次可以将逆序数量减少大于 1。 希尔排序使用插入排序对间隔 h 的序列进行排序。通过不断减小 h,最后令 h=1,就可以使得整个数组是有序的。
性质:
- 递增数列一般采用3x+1:1,4,13,40,121,364…..,使用这种递增数列的希尔排序所需的比较次数不会超过N的若干倍乘以递增数列的长度。
- 最坏情况下,使用3x+1递增数列的希尔排序的比较次数是O(N^(3/2))
代码:
public static void shellSort(Comparable[] a) {
	if (a == null || a.length < 2) {
		return;
	}

	int n = a.length;

	// 3x+1 increment sequence: 1, 4, 13, 40, 121, 364, 1093...
	int h = 1;
	while (h < n / 3) {
		h = 3 * h + 1;
	}

	while (h >= 1) {
		// h-sort the array
		for (int i = h; i < n; i++) {
			for (int j = i; j >= h && less(a[j], a[j - h]); j -= h) {
				exec(a, j - h, j);
			}
		}

		h /= 3;
	}
}
基本算法复杂度总结:
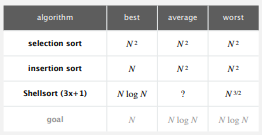
归并排序
思路:
- Divide array into two halves.
- Recursively sort each half.
- Merge two halves.
归并方法的实现: 1.先将所有元素复制到aux[]中,再归并回a[]中。 2.归并时的四个判断:
- 左半边用尽(取右半边元素)
- 右半边用尽(取左半边元素)
- 右半边的当前元素小于左半边的当前元素(取右半边的元素)
- 右半边的当前元素大于/等于左半边的当前元素(取左半边的元素)
// merging
public static void merge(Comparable[] a, Comparable[] aux, int lo, int mid, int hi) {

	// copy to aux[]
	for (int k = lo; k <= hi; k++) {
		aux[k] = a[k];
	}

	/*
	 * 1 3 5 7   2 4 6 8
	 * i         j
	*/
	int i = lo;
	int j = mid + 1;

	// merge back to a[]
	for (int k = lo; k <= hi; k++) {
		// 左边元素用尽
		if (i > mid) {
			a[k] = aux[j++];
		// 右边元素用尽
		} else if (j > hi) {
			a[k] = aux[i++];
		// 左边元素比右边小,先进行这一步,保证稳定性
		} else if (less(aux[i], aux[j])) {
			a[k] = aux[i++];
		// 右边元素比左边小
		} else {
			a[k] = aux[j++];
		}
	}
}
Top-down mergesort(自顶向下的归并排序)
将一个大数组分成两个小数组去求解。 因为每次都将问题对半分成两个子问题,而这种对半分的算法复杂度一般为O(NlogN),因此该归并排序方法的时间复杂度也为 O(NlogN)。
public static void mergeSort(Comparable[] a, Comparable[] aux, int lo, int hi) {
	// base case
	if (hi <= lo) {
		return;
	}

	int mid = lo + (hi - lo) / 2;
	mergeSort(a, aux, lo, mid);
	mergeSort(a, aux, mid + 1, hi);
	merge(a, aux, lo, mid, hi);
}
轨迹图:
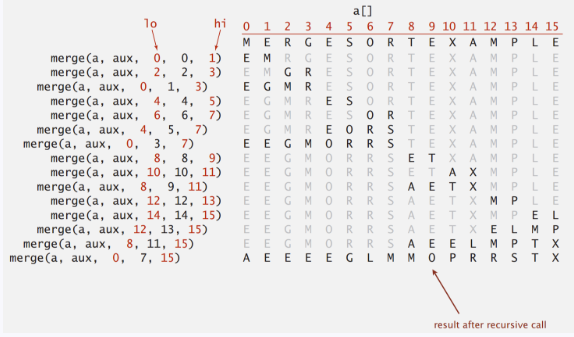 由图可知,原地归并排序的大致趋势是,先局部排序,再扩大规模;先左边排序,再右边排序;每次都是左边一半局部排完且merge了,右边一半才开始从最局部的地方开始排序。
改进:
- 对小规模子数组使用插入排序
- 测试数组是否已经有序(左边最大<右边最小时,直接返回)
- 不将元素复制到辅助数组(节省时间而非空间)
Bottom-up mergesort(自底向上的归并排序)
思路:
- 先归并微型数组,从两两归并开始(每个元素理解为大小为1的数组)
- 重复上述步骤,逐步扩大归并的规模,2,4,8….
代码:
// merge sort (bottom up)
public static void mergeSort(Comparable[] a) {
	int n = a.length;
	Comparable[] aux = new Comparable[a.length];
	for (int sz = 1; sz < n; sz = sz + sz) {
		for (int lo = 0; lo < n - sz; lo += sz + sz) {
			merge(a, aux, lo, lo + sz - 1, Math.min(lo + sz + sz - 1, n - 1));
		}
	}
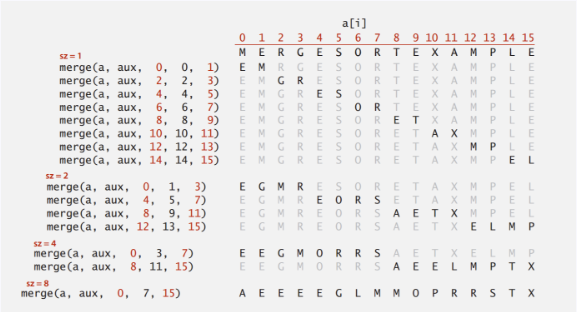
}
快速排序
思路: 快速排序通过一个切分元素将数组分为两个子数组,左子数组小于等于切分元素,右子数组大于等于切分元素,将这两个子数组排序也就将整个数组排序了。
下面代码使用随机快排,即每次在数组中随机选择一个数,并与数组最后一个数交换。
public static void quickSort(int[] a) {
	if(a == null || a.length < 2 ) {
		return;
	}

	quickSort(a, 0, a.length-1);
}

public static void quickSort(int[] a, int lo, int hi) {
	if (lo < hi) {
		swap(a, (int) (Math.random() * (hi - lo + 1)) + lo, hi);
		int[] position = partition(a, lo, hi);
		quickSort(a, lo, position[0] - 1);			quickSort(a, position[1] + 1, hi);
	}
}


public static int[] partition(int[] a, int lo, int hi) {
	int p1 = lo -1;
	int p2 = hi;

	while(lo < p2) {
		if(a[lo] < a[hi]) {
			swap(a, ++p1, lo++);
		} else if (a[lo] > a[hi]) {
			swap(a, --p2, lo);
		} else {
			lo++;
		}
	}

	swap(a, p2, hi);

	return new int[] {p1 +1, p2};
}

public static void swap(int[] a, int i, int j) {
	int tmp = a[i];
	a[i] = a[j];
	a[j] = tmp;
}
性能分析: 快速排序是原地排序,不需要辅助数组,但是递归调用需要辅助栈。
快速排序最好的情况下是每次都正好能将数组对半分,这样递归调用次数才是最少的。这种情况下比较次数为 CN=2CN/2+N,复杂度为 O(NlogN)。
最坏的情况下,第一次从最小的元素切分,第二次从第二小的元素切分,如此这般。因此最坏的情况下需要比较 N2/2。为了防止数组最开始就是有序的,在进行快速排序时需要随机打乱数组。
随机快排的空间复杂度为O(logN)
堆排序
前言: 1.堆结构其实是
完全二叉树结构,一个数组结构可以对应成一个完全二叉树结构,如数组[5, 3, 4, 6, 7, 9, 0, 6]可以反映为以下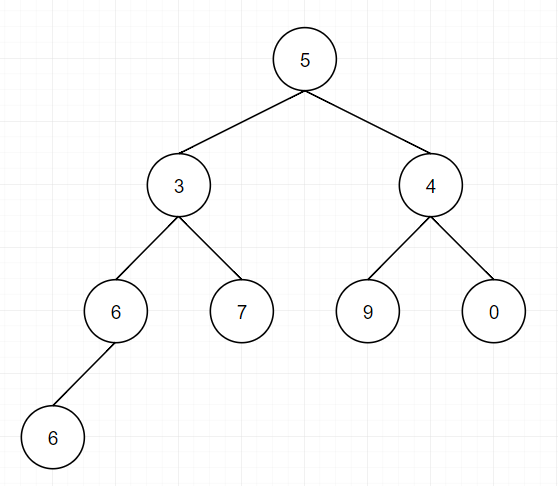
a[i]的左孩子下标为2i+1 a[i]的右孩子下标为2i+2 a[i]的父节点下标为(i-1)/22.大根堆:任意一颗子树包括自身,其最大值在头部,例如:
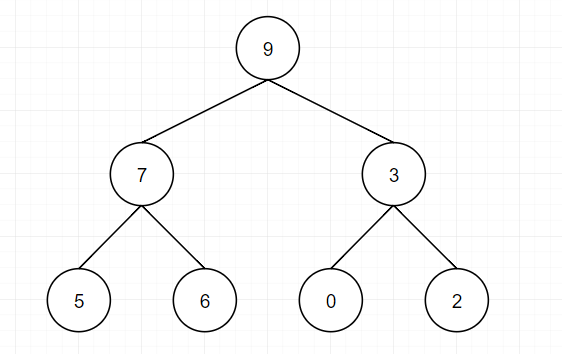
思路: 1.构建堆: 第一可以选择从左到右遍历数组并且进行heapinsert操作,这种方法的复杂度为O(0+log1+log2+log3+…) -> O(N) 第二种可以从右至左进行下沉操作,如果一个节点的两个节点都已经是堆有序,那么进行下沉操作可以使得这个节点为根节点的堆有序。叶子节点不需要进行下沉操作,可以忽略叶子节点的元素,因此只需要遍历一半的元素即可。
2.交换对顶元素与最后一个元素,交换之后对剩下的元素进行heapify操作,每一个元素的复杂度为logN, 一共复杂度为NlogN
代码实现:
public class HeapSort {

	public static void heapSort(int[] a) {
		if(a == null || a.length<2) {
			return;
		}

		// 构建堆
		int size = a.length;
		for(int i=0; i<size; i++) {
			heapInsert(a, i);
		}

		swap(a, 0, --size);
		while (size > 0) {
			heapify(a, 0, size);
			swap(a, 0, --size);
		}
	}


	public static void heapInsert(int[] a, int index) {
		while (a[index] > a[(index - 1) / 2]) {
			swap(a, index, (index - 1) / 2);
			index = (index - 1) / 2;
		}
	}

	public static void heapify(int[] a, int index, int size) {
		int left = index * 2 + 1;
		while (left < size) {
			// 一定要判断右孩子是否存在
			int max = left + 1 < size && a[left + 1] > a[left] ? left + 1 : left;
			max = a[max] > a[index] ? max : index;
			if (max == index) {
				break;
			}

			swap(a, max, index);
			// 一定要做这一步
			index = max;
			left = index * 2 + 1;
		}
	}

	public static void swap(int[] a, int i, int j) {
		int tmp = a[i];
		a[i] = a[j];
		a[j] = tmp;
	}
}
堆结构其实就是优先级队列结构 性能分析: 1.一个堆的高度为logN,因此在堆中插入元素和删除最大元素的复杂度都为logN。 2.对于堆排序,由于要对N个节点进行下沉操作,因此复杂度为 NlogN。 3.堆排序时一种原地排序,没有利用额外的空间。 4.现代操作系统很少使用堆排序,因为它无法利用局部性原理进行缓存,也就是数组元素很少和相邻的元素进行比较。
排序算法的稳定性及其汇总
首先解释什么叫做算法的稳定性,举例说明: 初始数组:1, 3, 2, 3, 5, 3
可以观察到数组中有三个相同的3,如果算法稳定那排序过后这三个3的相对顺序不会发生改变,他们的顺序还是第一个3, 第二个3, 第三个3.
简单的应用场景举例: 现在有一个表格:
水果 价格 数量 香蕉 $5 2 苹果 $2 2 草莓 $3 2 现在要求表格按照价格进行排序,然后再按照数量排序,如果算法具有稳定性,那最后的结果是保留了价格的次序,即价格和数量都是排好序的,因为数量排序的时候相同的2其相对位置不变,这样就满足了现实的需求。
冒泡排序:可以做到稳定性,再两个相同的数比较时让右边的数冒泡。 选择排序:不能做到稳定性, 举例: 6 3 3 3 3 1 2 5 当第一个3和2交换的时候,第一个3变成了最后一个3,所以无法实现。 插入排序:可以做到稳定性,当右边的数和左边的数相同时,不让右边的数和左边的交换即可。 归并排序:可以做到稳定性,当左区的数和右区的数相同时让左区的数归并,左区指针往后移一位。 快速排序:不能做到稳定性,如[6, 6, 6, 3, 5],以5为标准进去切分,则切分时第一个6于3交换,不能满足稳定性。 引申的例子:给定一个数组,满足 1.将奇数放左边,偶数放右边。 2.并且保持他们原来的顺序 3.使用inplace的方法,时间复杂度为O(N) 结论,不能满足上述要求,因为经典快排再切分的时候不能满足稳定性,快排与上述例子都满足
0-1标准,所以快排做不到,上述例子也做不到。 要想快排实现稳定性,可以参考论文: STABLE MINIMUM SPACE PARTITIONING IN LINEAR TIME 堆排序:不能满足稳定性
-
JavaScript-callback
回调函数
A “callback” is any function that is called by another function which takes the first function as a parameter. 在一个函数中调用另外一个函数就是callback。
举例
function a() {
    return 1;
}

function b(aa) {
    return 2 + aa;
}

var c = 0
c = b(a())
console.log(c)
输出3
异步
在上面的例子基础上再引入另一个概念:异步 举例:
// 设置全局变量a初值为0
var a = 0

function bb(x) {
    console.log(x)
}

// 然后过3秒后让a为6
function timer(time) {
    // setTimeout() 方法用于在指定的毫秒数后调用函数或计算表达式。
    // setTimeout(code,millisec)
    setTimeout(function () {
        a = 6
    }, time)
}

console.log(a)
timer(3000)
bb(a)
以上代码逻辑很简单,先设置全局变量a初值为0,然后过3秒后让a为6,接着输出a,理论上想的这次应该输出6. 但跑完代码输出结果为: 0 0 因为JS是一种异步执行语言,尽管timer函数内让a=6了,但是JS不会死等时间结束再跳出函数, 而是马上就会执行下一步语句(即调用bb函数),但这时候3秒钟根本就没结束,a还没有被重新赋值, 所以打印出来还是为0。 用回调函数可以解决这个问题:
var a = 0

function bb(x) {
    console.log(x)
}

function timer(time, callback) {
    // setTimeout() 方法用于在指定的毫秒数后调用函数或计算表达式。
    // setTimeout(code,millisec)
    setTimeout(function () {
        a = 6
        console.log("hi, a=" + a)
        callback(a)
    }, time)
}

console.log(a)
timer(3000, bb)
console.log("exit")
这次,在timer函数中添加了一个关键字callback,意思就是说此处不是一个普通的参数,而是一个函数名. 一般而言,函数的形参是指由外往内向函数体传递变量的入口,但此处加了callback后则完全相反, 它是指函数体在完成某种使命后调用外部函数的出口! 在本例中,控制台首先打印了0和exit,然后当3秒钟到了后,首先a=6,然后通过关键字callback(a)调用了函数bb(x),结果显示: 0 exit hi,a=6 6 这个逻辑,符合我们的需求。
在另一篇博客中,也提到回调函数的另一种理解:
A callback is a function that is passed as an argument to another function and is executed after its parent function has completed.
回调是一个函数被作为一个参数传递到另一个函数里,在那个函数执行完后再执行。( 也即:B函数被作为参数传递到A函数里,在A函数执行完后再执行B 举例:
function A(callback){
    console.log("I am A");
    callback();  //调用该函数
}
function B(){
   console.log("I am B");
}
A(B);
结果:”I am A”, “I am B”
嵌套回调
var i = 0;
function sleep(ms, callback) {
    console.log("hello")
    setTimeout(function() {
        console.log("我执行完了")
        i++
        if(i>=2) {
            callback(new Error('i大于2'), null)
        } else {
            callback(null, i)
        }
    }, ms)
}

sleep(3000, function (err, val) {
    if(err) return err.message
    console.log(val)
    sleep(3000, function (err, val) {
        if(err) return err.message
        console.log(val)
        sleep(3000, function (err, val) {
            if(err) return err.message
            console.log(val)
        })
    })
})

console.log("主程序没有被阻塞")
输出结果:
- 首先输出’hellp’, ‘主程序没有被阻塞’,
- 过三秒后输出’我执行完了’, ‘1’, ‘hello’,
- 又过三秒输出’我执行完了’,整个程序结束
可以看得出来,嵌套得很深,你可以把这三次操作看成三个异步任务,并且还有可能继续嵌套下去,这样的写法显然是反人类的。
嵌套得深首先一个不美观看的很不舒服,第二个如果回调函数出错了也难以判断在哪里出错的。
事件监听
var i = 0;
function sleep(ms) {
    var emitter = new require('events')();
    setTimeout(function () {
        console.log('我执行完啦!');
        i++;
        if (i >= 2) emitter.emit('error', new Error('i大于2'));
        else emitter.emit('done', i);
    }, ms);
}

var emit = sleep(3000)
emit.on('done', function(val) {
    console.log("success: " + val)
})
emit.on('error', function(err) {
    console.log("fail: " + err.message)
})
这样写比之前的好处在于能添加多个回调函数,每个回调函数都能获得值并进行相应操作。但这并没有解决回调嵌套的问题,
比如这个函数多次调用还是必须写在ondone的回调函数里,看起来还是很不方便。
Promise
promise和事件类似,你可以把它看成只触发两个事件的event对象,但是事件具有即时性,触发之后这个状态就不存在了,这个事件已经触发过了,你就再也拿不到值了,而promise不同,promise只有两个状态resolve和reject. 当它触发任何一个状态后它会将当前的值缓存起来,并在有回调函数添加进来的时候尝试调用回调函数,如果这个时候还没有触发resolve或者reject,那么回调函数会被缓存,等待调用,如果已经有了状态(resolve或者reject),则立刻调用回调函数。并且所有回调函数在执行后都立即被销毁。
var i = 0;
// 返回promise
function sleep(ms) {
    console.log("hello")
    return new Promise(function (resolve, reject) {
        setTimeout(() => {
            console.log("我执行好了")
            i++
            if( i>=2 ) reject(new Error('i>=2'))
            else resolve(i)
        }, ms);
    })
}

sleep(3000).then (function (val) {
    console.log(val)
    return sleep(3000)
}).then(function (val) {
    console.log(val)
    return sleep(3000)
}).then(function (val) {
    console.log(val)
    return sleep(3000)
}).catch(function (err) {
    console.log("出错了: " + err.message)
})

console.log("主程序没有被阻塞")
执行结果:
// 首先输出
主程序没有被阻塞
hello
// 过三秒后输出
我执行好了
1
hello
// 过三秒后输出
我执行好了
出错了: i>=2
这个例子中,首先它将原本嵌套的回调函数展开了,现在看的更舒服了,并且由于promise的冒泡性质,当promise链中的任意一个函数出错都会直接抛出到链的最底部,所以我们统一用了一个catch去捕获,每次promise的回调返回一个promise,这个promise把下一个then当作自己的回调函数,并在resolve之后执行,或在reject后被catch出来。这种链式的写法让函数的流程比较清楚了,抛弃了嵌套,终于能平整的写代码了。
关于promise其他博客更深入的介绍。
async await
但promise只是解决了回调嵌套的问题,并没有解决回调本身,我们看到的代码依然是用回调阻止的。于是这里就引入了async/await关键字。 async/await是es7的新标准,并且在node7.0中已经得到支持,只是需要使用harmony模式去运行。
async函数定义:
async function fn(){ return 0; }async函数的特征在于调用return返回的并不是一个普通的值,而是一个Promise对象,如果正常return了,则返回Promise.resolve(返回值),如果throw一个异常了,则返回Promise.reject(异常)。 也就是说async函数的返回值一定是一个promise,只是你写出来是一个普通的值,这仅仅是一个语法糖。 await关键字只能在async函数中才能使用,也就是说你不能在任意地方使用await。await关键字后跟一个promise对象,函数执行到await后会退出该函数,直到事件轮询检查到Promise有了状态resolve或reject 才重新执行这个函数后面的内容。
将以上程序用awiait进行改写
var i = 0;
//函数返回promise
function sleep(ms) {
    return new Promise(function (resolve, reject) {
        setTimeout(function () {
            console.log('我执行好了');
            i++;
            if (i >= 2) reject(new Error('i>=2'));
            else resolve(i);
        }, ms);
    })
}

(async function() {
    try {
        var val;
        val = await sleep(3000);
        console.log(val)
        val = await sleep(3000);
        console.log(val)
        val = await sleep(3000);
        console.log(val)
    }
    catch (err) {
        console.log('出错啦: ' + err.message)
    }
} ())

console.log("主程序没有被阻塞")
结果:
// 首先输出
主程序没有被阻塞
hello
// 过三秒后输出
我执行好了
1
hello
// 过三秒后输出
我执行好了
出错了: i>=2
总的来说async/await是promise的语法糖,但它能将原本异步的代码写成同步的形式,try…catch也是比较友好的捕获异常的方式
参考资料: node.js异步控制流程 回调,事件,promise和async/await 彻底理解NodeJs中的回调(Callback)函数 javascript的回调函数 同步 异步
-
Java基础-String
String
public final class String
    implements java.io.Serializable, Comparable<String>, CharSequence {
    /** The value is used for character storage. */
    private final char value[];
从String的源码中可以看出,String为final类,不可以被继承,内部使用char[]进行储存数据,并且被声明为final,说明value数组初始化后就不能再引用其他数组,且String内部没有改变value数组的方法,因此可以保证String不变。
其中String不可变的好处见这篇博客
String Pool
字符串常量池(String Pool)保存着所有字符串字面量(literal strings),这些字面量在编译时期就确定。不仅如此,还可以使用 String 的
intern()方法在运行过程中将字符串添加到String Pool中。当一个字符串调用 intern() 方法时,如果String Pool 中已经存在一个字符串和该字符串值相等(使用 equals()方法进行确定),那么就会返回String Pool中字符串的引用;否则,就会在String Pool 中添加一个新的字符串,并返回这个新字符串的引用。
下面示例中s1和s2采用newString()的方式新建了两个不同字符串,而s3和s4是通过s1.intern()方法取得一个字符串引用。intern()首先把s1引用的字符串放到 String Pool中,然后返回这个字符串引用。因此 s3 和 s4 引用的是同一个字符串。
String s1 = new String("aaa");
String s2 = new String("aaa");
System.out.println(s1 == s2); //false

String s3 = s1.intern();
String s4 = s1.intern();
System.out.println(s3 == s4); // true
如果采用直接赋值,那么会自动存放到常量池中
String s5 = "bbb";
String s6 = "bbb";
System.out.println(s5 == s6); // true
在 Java 7 之前,String Pool 被放在运行时常量池中,它属于永久代。而在 Java 7,String Pool 被移到堆中。这是因为永久代的空间有限,在大量使用字符串的场景下会导致 OutOfMemoryError 错误。
String s1 = new String(“abc”)与String s2 = “abc”的区别: 使用直接赋值只会在字符串常量池创建一个”abc”字符串对象,常量池中的数据是在编译期赋值的,也就是生成class文件时就把它放到常量池里了。
使用new String(“abc”),不仅会在字符串常量池创建一个”abc”字符串对象,还会在堆中生成对象,堆区中是运行期分配的,这种方式比较浪费内存。
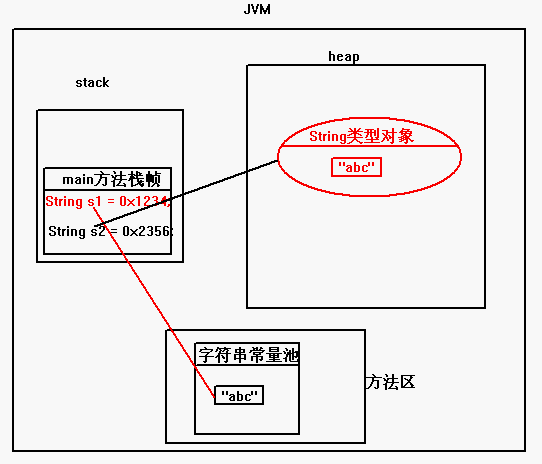 如果是运行时对字符串相加或相减会放到堆中(放之前会先验证方法区中是否含有相同的字符串常量,如果存在,把地址返回,如果不存在,先将字符串常量放到池中,然后再返回该对象的地址)
StringBuffer and StringBuilder
因为String 是不可变对象,如果多个字符串进行拼接,将会形成多个对象,这样可能会造成 内存溢出。 StringBuffer称为字符串缓冲区,它的工作原理是:预先申请一块内存,存放字符序列,如果字符序列满了,会重新改变缓存区的大小,以容纳更多的字符序列。StringBuffer是可变对象,这个是String最大的不同。 StringBuffer是线程安全的,可以在多线程环境下使用,内部使用synchronized进行同步。 StringBuffer是线程不安全的,在多线程环境下使用可能会有问题。
StringBuffer sBuffer = new StringBuffer();

System.out.println(sBuffer.capacity()); // 16
System.out.println(sBuffer.length()); // 0

sBuffer.append("there is 17 chars");
system.out.println(sBuffer.capacity()); // 34
System.out.println(sBuffer.length()); //17
/** * Constructs a string buffer with no characters in it and an * initial capacity of 16 characters. */ public StringBuffer() { super(16); } public AbstractStringBuilder append(String str) { if (str == null) return appendNull(); int len = str.length(); ensureCapacityInternal(count + len); str.getChars(0, len, value, count); count += len; return this; } private void ensureCapacityInternal(int minimumCapacity) { // overflow-conscious code if (minimumCapacity - value.length > 0) { value = Arrays.copyOf(value, newCapacity(minimumCapacity)); } } private int newCapacity(int minCapacity) { // overflow-conscious code int newCapacity = (value.length << 1) + 2; if (newCapacity - minCapacity < 0) { newCapacity = minCapacity; } return (newCapacity <= 0 || MAX_ARRAY_SIZE - newCapacity < 0) ? hugeCapacity(minCapacity) : newCapacity; }StringBuffer和StringBuilder初始容量(capacity)为16. 进行字符串append添加的时候,会先计算添加后字符串大小,传入一个方法:ensureCapacityInternal 这个方法进行是否扩容的判断,需要扩容就调用newCapacity方法进行扩容:当容量不够时变为length*2+2.
-
Spring-DAO-事务管理
事务原本是数据库中的概念,在Dao层。但一般情况下,需要将事务提升到业务层,即Service层。这样做是为了能够使用事务的特性来管理具体的业务。在Spring中通常可以通过以下三种方式来实现对事务的管理: (1)使用Spring的事务代理工厂管理事务 (2)使用Spring的事务注解管理事务 (3)使用AspectJ的AOP配置管理事务
Spring的事务管理API
Spring的事务管理,主要用到两个事务相关的接口。
PlatformTransactionManager
事务管理器是PlatformTransactionManager接口对象。其主要用于完成事务的提交、回滚,及获取事务的状态信息。
PlatformTransactionManager接口有两个常用的实现类:
- DataSourceTransactionManager:使用JDBC或iBatis 进行持久化数据时使用。
- HibernateTransactionManager:使用Hibernate进行持久化数据时使用。
Spring事务的默认回滚方式是:发生运行时异常时回滚,发生受查异常时提交。不过,对于受查异常,程序员也可以手工设置其回滚方式。
TransactionDefinition
事务定义接口TransactionDefinition中定义了事务描述相关的三类常量:事务隔离级别、事务传播行为、事务默认超时时限,及对它们的操作。
定义了五个事务隔离级别常量
- DEFAULT:采用DB默认的事务隔离级别。MySql的默认为REPEATABLE_READ; Oracle默认为READ_COMMITTED。
- READ_UNCOMMITTED:读未提交。未解决任何并发问题。
- READ_COMMITTED:读已提交。解决脏读,存在不可重复读与幻读。
- REPEATABLE_READ:可重复读。解决脏读、不可重复读,存在幻读
- SERIALIZABLE:串行化。不存在并发问题。
定义了七个事务传播行为常量
所谓事务传播行为是指,处于不同事务中的方法在相互调用时,执行期间事务的维护情况。如,A事务中的方法doSome()调用B事务中的方法doOther(),在调用执行期间事务的维护情况,就称为事务传播行为。事务传播行为是加在方法上的。
- REQUIRED:指定的方法必须在事务内执行。若当前存在事务,就加入到当前事务中;若当前没有事务,则创建一个新事务。这种传播行为是最常见的选择,也是Spring默认的事务传播行为。 如该传播行为加在doOther()方法上。若doSome()方法在执行时就是在事务内的,则doOther()方法的执行也加入到该事务内执行。若doSome()方法没有在事务内执行,则doOther()方法会创建一个事务,并在其中执行。
- SUPPORTS:指定的方法支持当前事务,但若当前没有事务,也可以以非事务方式执行。
- MANDATORY:指定的方法必须在当前事务内执行,若当前没有事务,则直接抛出异常。
- REQUIRES_NEW:总是新建一个事务,若当前存在事务,就将当前事务挂起,直到新事务执行完毕。
- NOT_SUPPORTED:指定的方法不能在事务环境中执行,若当前存在事务,就将当前事务挂起。
- NEVER:指定的方法不能在事务环境下执行,若当前存在事务,就直接抛出异常。
- NESTED:指定的方法必须在事务内执行。若当前存在事务,则在嵌套事务内执行;若当前没有事务,则创建一个新事务。
定义了默认事务超时时限
常量TIMEOUT_DEFAULT定义了事务底层默认的超时时限,及不支持事务超时时限设置的none值。 注意,事务的超时时限起作用的条件比较多,且超时的时间计算点较复杂。所以,该值一般就使用默认值即可。
程序举例环境搭建
本例要实现模拟购买股票。存在两个实体:银行账户Account与股票账户Stock。当要购买股票时,需要从Account中扣除相应金额的存款,然后在Stock中增加相应的股票数量。而在这个过程中,可能会抛出一个用户自定义的异常。异常的抛出,将会使两个操作回滚。
1.创建实体类Account与Stock
public class Account {
	private Integer id;
	private String aname;
	private double balance;
	//...
}

public class Stock {
	private Integer id;
	private String sname;
	private int count;
	// ....
}
2.创建数据库表
CREATE TABLE `account` (
  `id` int(11) NOT NULL AUTO_INCREMENT,
  `aname` varchar(45) DEFAULT NULL,
  `balance` double DEFAULT NULL,
  PRIMARY KEY (`id`)
) ENGINE=InnoDB DEFAULT CHARSET=utf8;

CREATE TABLE `stock` (
  `id` int(11) NOT NULL AUTO_INCREMENT,
  `sname` varchar(45) DEFAULT NULL,
  `count` int(11) DEFAULT NULL,
  PRIMARY KEY (`id`)
) ENGINE=InnoDB DEFAULT CHARSET=utf8;
3.定义service
public interface IBuyStockService {
	void openAccount(String aname, double money);

	void openStock(String sname, int amount);

	void buyStock(String aname, double money, String sname, int amount);
}

public class BuyStockServiceImpl implements IBuyStockService{
	private IAccountDao aDao;
	private IStockDao sDao;

	public void setaDao(IAccountDao aDao) {
		this.aDao = aDao;
	}

	public void setsDao(IStockDao sDao) {
		this.sDao = sDao;
	}

	@Override
	public void openAccount(String aname, double money) {
		aDao.insertAccount(aname, money);
	}

	@Override
	public void openStock(String sname, int amount) {
		sDao.insertStock(sname, amount);
	}

	@Override
	public void buyStock(String aname, double money, String sname, int amount) {
		boolean isBuy = true;
		aDao.updateAccount(aname, money, isBuy);
		sDao.updateStock(sname,amount, isBuy);
	}
}
4.定义dao
public interface IAccountDao {

	void insertAccount(String aname, double money);

	void updateAccount(String aname, double money, boolean isBuy);

}

public class AccountDaoImp extends JdbcDaoSupport implements IAccountDao{

	@Override
	public void insertAccount(String aname, double money) {
		String sql = "insert into account(aname, balance) values(?,?) ";
		this.getJdbcTemplate().update(sql, aname, money);
	}

	@Override
	public void updateAccount(String aname, double money, boolean isBuy) {
		String sql = "update account set balance=balance+? where aname=?";
		if (isBuy) {
			sql = "update account set balance=balance-? where aname=?";
		}

		this.getJdbcTemplate().update(sql, money, aname);
	}
}

public interface IStockDao {

	void insertStock(String sname, int amount);

	void updateStock(String sname, int amount, boolean isBuy);

}

public class StockDaoImpl extends JdbcDaoSupport implements IStockDao{

	@Override
	public void insertStock(String sname, int amount) {
		String sql = "insert into stock(sname, count) values(?,?)";
		this.getJdbcTemplate().update(sql,sname, amount);
	}

	@Override
	public void updateStock(String sname, int amount, boolean isBuy) {
		String sql = "update stock set count=count-? where sname=?";
		if(isBuy) {
			sql = "update stock set count=count+? where sname=?";
		}
		this.getJdbcTemplate().update(sql, amount, sname);
	}
}
5.配置xml文件
<?xml version="1.0" encoding="UTF-8"?>
<beans xmlns="http://www.springframework.org/schema/beans"
    xmlns:xsi="http://www.w3.org/2001/XMLSchema-instance"
    xmlns:context="http://www.springframework.org/schema/context" xsi:schemaLocation="
        http://www.springframework.org/schema/beans http://www.springframework.org/schema/beans/spring-beans.xsd
        http://www.springframework.org/schema/context http://www.springframework.org/schema/context/spring-context.xsd">
    <!-- bean definitions here -->

    <!--  注册属性方式二 -->
    <context:property-placeholder location="classpath:jdbc.properties" />

	<bean id="myDataSource" class="com.mchange.v2.c3p0.ComboPooledDataSource">
		<property name="driverClass" value="${jdbc.driver}"></property>
		<property name="jdbcUrl" value="${jdbc.url}"></property>
		<property name="user" value="${jdbc.user}"></property>
		<property name="password" value="${jdbc.password}"></property>
	</bean>

	<!--  注册dao二 -->
	<bean id="accountDao" class="love.minmin.dao.AccountDaoImp">
		<property name="dataSource" ref="myDataSource"></property>
	</bean>

	<bean id="stockDao" class="love.minmin.dao.StockDaoImpl">
		<property name="dataSource" ref="myDataSource"></property>
	</bean>

	<!--  注册service -->
	<bean id="buystockService" class="love.minmin.services.BuyStockServiceImpl">
		<property name="aDao" ref="accountDao"></property>
		<property name="sDao" ref="stockDao"></property>
	</bean>

</beans>
6.定义测试类
public class MyTest {

	private IBuyStockService service;

	@Before
	public void init() {
		// 初始化,创建容器对象并创建service对象
		String resource = "applicationContext.xml";
		ApplicationContext ac = new ClassPathXmlApplicationContext(resource);
		service = (IBuyStockService) ac.getBean("buystockService");
	}

	@Test
	public void test01() {
		service.openAccount("minmin", 100);
		service.openStock("love", 0);
	}

	@Test
	public void test02() {
		service.buyStock("minmin", 50, "love", 1);
	}
}
测试结果成功,现在需要给buyStock添加抛出异常,并实现在service层的事务回滚操作。
1.自定义异常
public class BuyStockException extends Exception {

	public BuyStockException() {
		super();
	}

	public BuyStockException(String message) {
		super(message);
	}
}
2.修改buyStock方法:
@Override
	public void buyStock(String aname, double money, String sname, int amount) throws BuyStockException {
		boolean isBuy = true;
		aDao.updateAccount(aname, money, isBuy);
		if (1 == 1) {
			throw new BuyStockException("购买股票异常");
		}
		sDao.updateStock(sname,amount, isBuy);
	}
Spring通常有三种方法实现事务管理
使用Spring的事务代理工厂管理事务
该方式是,需要为目标类,即Service的实现类创建事务代理。事务代理使用的类是TransactionProxyFactoryBean,需要导入:aop联盟,及Spring对AOP实现的Jar包。该类需要初始化如下一些属性: (1)transactionManager:事务管理器 (2)target:目标对象,即Service实现类对象 (3)transactionAttributes:事务属性设置
添加相关xml配置:
<!-- 配置事务管理器 -->
	<bean id="myTransactionManager" class="org.springframework.jdbc.datasource.DataSourceTransactionManager">
		<property name="dataSource" ref="myDataSource"></property>
	</bean>

	<!-- 配置service的事务切面处理 -->
	<bean id="myServiceProxy" class="org.springframework.transaction.interceptor.TransactionProxyFactoryBean">
		<property name="transactionManager" ref="myTransactionManager"></property>
		<property name="target" ref="buystockService"></property>
		<property name="transactionAttributes">
			<props>
			<prop key="open*">ISOLATION_DEFAULT, PROPAGATION_REQUIRED</prop>
			<!--
			通过“-异常”方式,可使发生指定的异常时事务回滚;这是的异常通常是受查异常
			通过“+异常”方式,可使发生指定的异常时事务提交。这是的异常通常是运行时异常
			-->
			<prop key="buyStock">ISOLATION_DEFAULT, PROPAGATION_REQUIRED, -BuyStockException</prop>
			</props>
		</property>
	</bean>
使用Spring的事务注解管理事务
通过@Transactional注解方式,也可将事务织入到相应方法中。而使用注解方式,只需在配置文件中加入一个tx标签,以告诉spring使用注解来完成事务的织入。该标签只需指定一个属性,事务管理器。
@Transactional的所有可选属性如下所示:
- propagation:用于设置事务传播属性。该属性类型为Propagation枚举,默认值为Propagation.REQUIRED。
- isolation:用于设置事务的隔离级别。该属性类型为Isolation枚举,默认值为Isolation.DEFAULT。
- readOnly:用于设置该方法对数据库的操作是否是只读的。该属性为boolean,默认值为false。 timeout:用于设置本操作与数据库连接的超时时限。单位为秒,类型为int,默认值为-1,即没有时限。
- rollbackFor:指定需要回滚的异常类。类型为Class[],默认值为空数组。当然,若只有一个异常类时,可以不使用数组。
- rollbackForClassName:指定需要回滚的异常类类名。类型为String[],默认值为空数组。当然,若只有一个异常类时,可以不使用数组。
- noRollbackFor:指定不需要回滚的异常类。类型为Class[],默认值为空数组。当然,若只有一个异常类时,可以不使用数组。
- noRollbackForClassName:指定不需要回滚的异常类类名。类型为String[],默认值为空数组。当然,若只有一个异常类时,可以不使用数组。
注意的是,@Transactional若用在方法上,只能用于public方法上。对于其他非public方法,如果加上了注解@Transactional,虽然Spring不会报错,但不会将指定事务织入到该方法中。因为Spring会忽略掉所有非public方法上的@Transaction注解。 若@Transaction注解在类上,则表示该类上所有的方法均将在执行时织入事务。
xml相关配置
<!-- 配置事务注解驱动-->
	<tx:annotation-driven transaction-manager="myTransactionManager" />
添加注解
@Transactional(isolation=Isolation.DEFAULT, propagation=Propagation.REQUIRED, rollbackFor=BuyStockException.class)
	@Override
	public void buyStock(String aname, double money, String sname, int amount) throws BuyStockException {
		boolean isBuy = true;
		aDao.updateAccount(aname, money, isBuy);
		if (1 == 1) {
			throw new BuyStockException("购买股票异常");
		}
		sDao.updateStock(sname,amount, isBuy);
	}
使用AspectJ的AOP配置管理事务
使用XML配置事务代理的方式的不足是,每个目标类都需要配置事务代理。当目标类较多,配置文件会变得非常臃肿。使用XML配置顾问方式可以自动为每个符合切入点表达式的类生成事务代理。
这里使用Spring的AspectJ方式将事务进行的织入,所以,这里除了前面导入的aop的两个Jar包外,还需要两个Jar包:AspectJ的Jar包,及Spring整合AspectJ的Jar包。
将前面service方法中的Transaction注解删除,并将xml文件做如下配置:
<!-- 配置事务管理器 -->
	<bean id="myTransactionManager" class="org.springframework.jdbc.datasource.DataSourceTransactionManager">
		<property name="dataSource" ref="myDataSource"></property>
	</bean>

	<!-- 配置事务通知 -->
	<tx:advice id="myAdvice" transaction-manager="myTransactionManager">
		<tx:attributes>
			<!-- 这里指定的是:为每一个连接点指定索要应用的事务属性 -->
			<tx:method name="open*" isolation="DEFAULT" propagation="REQUIRED"/>
			<tx:method name="buyStock" isolation="DEFAULT" propagation="REQUIRED" rollback-for="BuyStockException"/>
		</tx:attributes>
	</tx:advice>

	<!-- AOP配置 -->

	<aop:config>
		<!-- 这里指定的是切入点,指定切入点之后相关的连接点才生效,顾问=通知+切入点 -->
		<!-- execution表达式里必须明确指明services层,不能写成"execution(* *..*.*.*(..))" -->
		<!-- 这样会造成service层与dao层的循环调用-->
		<aop:pointcut expression="execution(* *..services.*.*(..))" id="myPointCut"/>

		<aop:advisor advice-ref="myAdvice" pointcut-ref="myPointCut"/>
	</aop:config>